
Some time ago I tried to get eduvpn working with wireguard over TCP. As you might remember I wasn’t able to make it work reliably so I skipped that attempt for the time being.
Now some time has passed and I decided to start over with a more basic approach to get a feeling about how the components involved work (and hopefully gain enough experience to also get it working with eduvpn later on).
An to be honest I also had a real world problem I needed to solve: I had a virtual machine in a private network that I wanted to connect to the outside world using wireguard. However some component on the way (NAT-gateway, firewall or another component of the openstack environment) prevented UDP connections – TCP connections however seemed to work.
In the end a perfect setup to try wireguard over TCP.
Basics
I’ll skip the default UDP wireguard setup as there’s plenty of documentation for that out there.
And there’s also quite some documentation about wireguard over TCP, however I didn’t find some good beginner level explanation about how the components work together and especially what was the minimum setup required to make things work.
There are descriptions about apache reverse proxies with SSL support and URL rewriting and an illustration about how things work on a network level, but I still had a hard time figuring out what was really needed – which in the end turned out to be much less). So this article will hopefully help to make your first steps easier for you.
Minimum setup
So let’s assume we have a very basic setup of two hosts (one wireguard server and one client).
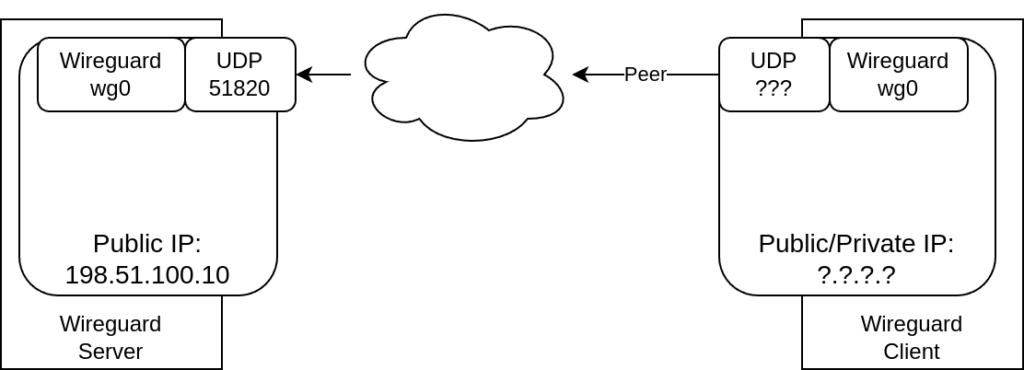
In this example our wireguard server (public IP 198.51.100.10) is listening on UDP port 51820. The client does not require a specific IP or port – all required connection information will be taken from the connection (once it is established).
In order to make wireguard over TCP work we need to squeeze in a proxy component on each side and set some pointers to the new components.
Software installation
First of all we need to install some software. As ususal my test setup is with Ubuntu LTS (24.04). I did explain how to add the required package repositories in a former post.
Once the repositories are configured installation is only one apt command away: So let’s install the proxyguard-server package on the server side
server # apt install proxyguard-serverand the package proxyguard-client on the client side:
client # apt install proxyguard-clientConfiguration of proxyguard (server and client)
Now all we need to do is:
- Server side (proxyguard-server):
- Set TCP listen IP:port
- Set UDP IP:port of local wireguard interface
- Start proxyguard-server
- Client side (proxyguard-client)
- Set UDP IP:port of local wireguard interface
- Set forwarding URL:port (TCP)
- Set peer ip of VPN server (in case of DNS problems)
- Start proxyguard-client
- Client side (wireguard client)
- Change [Peer] configuration an make it point to proxyguard-client
- Restart wireguard service
In the end our configuration should look like this:

Configuration: 1. Server side (proxyguard-server)
But let’s start from the beginning (1.): The proxyguard-server configuration takes place in /etc/default/proxyguard-server:
server # cat /etc/default/proxyguard-server
LISTEN=0.0.0.0:51820
TO=127.0.0.1:51820
So we’ll listen on port 51820/TCP on all interfaces (IP: 0.0.0.0). All incoming traffic will be processed by proxyguard-server and forwarded to our local (127.0.0.1) wireguard interface on port 51820/UDP.
That’s about all we need to do on the server side (besides starting the service):
server # systemctl start proxyguard-serverDepending on your setup you may need to open the new TCP port in your firewall config.
Configuration: 2. Client side (proxyguard-client)
No surprise with the proxyguard-client configuration: it is done in /etc/default/proxyguard-client:
server # cat /etc/default/proxyguard-client
LISTEN=127.0.0.1:51820
TO=http://vpn.mydomain.de:51820/proxyguard/
PEER_IPS=198.51.100.10
So we’ll make our proxyguard-client listen on localhost port 51820/UDP (where it will act like a normal wireguard peer). For the connection to our proxyguard-server we’ll specify its DNS name (vpn.mydomain.de) and TCP port (51820). In case of DNS problems we also specify the corresponding IP address (198.51.100.10).
After that just start the service:
server # systemctl start proxyguard-clientConfiguration: 3. Client side (wireguard client)
Now to our final step, the configuration of our wireguard client. The client usually has its peer set to our wireguard server (specified in the [Peer] section of its config file – usually /etc/wireguard/wg0.conf).
We’ll replace that part and make it point to the proxyguard UDP port (s. section [Peer], EndPoint):
client # cat /etc/wireguard/wg0.conf
[Interface]
<... just keep this section as is ...>
<... but make sure to use a different ListenPort for wireguard and proxyguard-client ...>

[Peer]
PublicKey = < ... leave the public key as is ...>
AllowedIPs = < ... leave this option as is ...>
EndPoint = 127.0.0.1:51820
After restarting the wireguard interface you should be able to connect:
client # systemctl restart wg-quick@wg0And that’s it!
Check setup
In order to check your setup start a ping to your servers (internal) wireguard IP and have a look at your logs.
On server side you won’t see much if everything works as expected:
server # journalctl -u proxyguard-server
<...>
systemd[1]: Started proxyguard-server-wg0.service - Proxy UDP traffic over TCP and HTTP(S).
The client side is more chatty:
client # journalctl -f -u proxyguard-client
<...>
systemd[1]: Started proxyguard-client.service - Proxy UDP traffic over TCP and HTTP(S).
<...>
proxyguard-client[8166]: 2024/12/06 14:43:01 [Client] Connecting to HTTP server...
proxyguard-client[8166]: 2024/12/06 14:43:01 [Client] Connected to HTTP server
proxyguard-client[8166]: 2024/12/06 14:43:01 [Client] Waiting for first UDP packet...
proxyguard-client[8166]: 2024/12/06 14:43:02 [Client] First UDP packet received with address: 127.0.0.1:45645
proxyguard-client[8166]: 2024/12/06 14:43:02 [Client] Client is ready for converting UDP<->HTTP
<...>
(Both outputs are shortened to show the relevant part only).